Low-Frequency Detection and Classification System (LFDCS)
The low-frequency detection and classification system (LFDCS) is an automated processing system designed to identify baleen whale calls using pitch tracking and quadratic discriminant function analysis (see Baumgartner and Mussoline 2011). The LFDCS algorithm uses dynamic programming to estimate a pitch track for any type of narrowband call. A pitch track is a compact representation of a sound (analogous to a series of notes on a page of sheet music) derived from an audio spectrogram; it consists of a time series of frequency-amplitude pairs that describe the frequency and amplitude modulation of a sound. Attributes of the pitch track (e.g., start frequency, end frequency, duration, slope of frequency variation) are extracted and compared to the attributes of known call types using quadratic discriminant function analysis. The call library can contain hundreds of these known call types, allowing the LFDCS to efficiently detect and classify many different calls produced by numerous species.
The desktop LFDCS requires (IDL), a commercial programming and graphical display system similar to Matlab and R, and it currently only runs on Apple Macintosh computers. It saves audio, spectrograms, and autodetections in (NetCDF), a self-describing data format that is particularly adept at incorporating ample metadata. Autodetections can be exported from these NetCDF files into simple comma-delimited text files for importing into other analysis software packages.
This webpage is the user manual for the desktop version of the LFDCS. A version of the LFDCS has also been implemented on the digital acoustic monitoring (DMON) instrument for detecting baleen whales from autonomous platforms in near real time (Baumgartner et al. 2013; see also dcs.whoi.edu. Call libraries developed with the desktop LFDCS are directly portable to the DMON/LFDCS.
How to use this webpage
This is a living document and it will therefore change from time to time as new features are added or clarity about certain capabilities is needed. If you see errors in the instructions, please contact me. If you have questions that are not answered here, don't hesitate to contact me at mbaumgartner@whoi.edu.
Mark Baumgartner, Biology Department, Woods Hole Oceanographic Institution
Processing new recordings
Instructions
- 1. In the "lfdcs/process/paramfiles" directory, create and edit a new file containing all of the processing parameters (see The parameter file section below).
- 2. Launch IDL in the "lfdcs/process" directory.
- 3. IDL> reformat_detect_classify, parameter_file
- parameter_file is the name of the processing parameter file (see The parameter file section below)
Keyword parameters
- nolfdcs - Only convert raw audio to specaudio files without running LFDCS (e.g., /nolfdcs)
- noconvert - Just run LFDCS without converting raw qudio to specaudio files. Note that specaudio files must already exist (e.g., /noconvert)
- start_date - specify the date to start reformatting and processing in MM/DD/YY HH:MM:SS format (e.g., start_date='02/01/10 00:00:00')
- end_date - specify the date to end reformatting and processing in MM/DD/YY HH:MM:SS format (e.g., end_date='02/15/10 00:00:00')
- verbose - output extra information about processing (e.g., /verbose)
Example
- Edit "bering_sea_M8.txt" in lfdcs/process/paramfiles/bering_sea
- Open the Terminal window
- Change directory to lfdcs/process (e.g., cd ~/Projects/Detectors/lfdcs/process)
- Launch IDL
- IDL> reformat_detect_classify, 'paramfiles/bering_sea/bering_sea_M8.txt'
Details
The "reformat_detect_classify" program
- reformats all the audio data into NetCDF files containing both the original recordings and spectrograms of the recordings,
- runs the LFDCS on the spectrograms to detect and classify calls based on both narrow- and broadband call libraries,
- outputs detection and classification information (including pitch tracks for narrowband calls) to NetCDF files, and
- archives both the narrow- and broadband call libraries.
Reformatted recordings and spectrograms are stored in a subdirectory of the output directory (specified as "Outdir" in the parameter file) called "specaudio", while detection and classification information is stored in a subdirectory of the output directory called "lfdcs". The archived narrow- and broadband call libraries are stored in subdirectories "lfdcs/call_library_nb" and "lfdcs/call_library_bb", respectively. The directory structure is as follows:

The parameter file
The parameter file controls the behavior of the LFDCS, including spectrogram creation, noise reduction, pitch tracking, and classification. Parameters are specified in a single text file (one parameter per line) as follows:
ParameterName: ParameterValue
An example parameter file is here: example_parameter_file.txt. Parameter files are typically placed in lfdcs/process/paramfiles. Each parameter specified in the parameter file is described below:
- Experiment: A description of the study from which the recorder data came.
- Location: Location of the study.
- Originator: Person providing/collecting the data.
- PlatformType: The type of platform from which the data come (e.g., mooring, glider).
- PlatformID: An identifier for the specific platform used.
- InstrumentType: The type of instrument with which the data was collected (e.g., HARU, AURAL, DMON).
- InstrumentID: An identifier for the specific instrument used.
- Indir: Input directory where all raw audio data resides.
- Outdir: Output directory in which subdirectories "specaudio" and "lfdcs" will be created and into which all output NetCDF files will be placed.
- FileExtension: Filename extension of raw audio (e.g., if raw audio files end with ".wav", then set FileExtension to "wav")
- FileFormat: Format of raw audio files (e.g., WAV, WAV24, AIF, NETCDF)
- FileDateSpec: A string indicating the format of the date/time encoded in the raw audio filenames. String can contain any of the following:
- Y: year
- M: month
- D: day
- h: hour
- m: minute
- s: second
- f: fractions of seconds expressed in milliseconds
- u: fractions of seconds expressed in microseconds
- N: abbreviated month name (e.g., Jan, Feb, Mar)
- S: seconds since midnight, January 1, 1970
- X: any single character
- x: any single character
- *: any group of characters
- Example: for raw audio files that are in WAV format and have a filename that looks like this: audio_012015_131500-gom.wav, use the following:
- FileExtension: wav
- FileFormat: WAV
- FileDateSpec: _MMDDYY_HHMMSS-
- The date/time in the filename above would be interpreted as January 20, 2015 at 13:15:00
- Example: for raw audio files that are in 24-bit WAV format and have a filename that looks like this: audio$jan20-2015-1315$gom.wav, use the following:
- FileExtension: wav
- FileFormat: WAV24
- FileDateSpec: $NNNDD-YYYY-HHMM$
- The date/time in the filename above would be interpreted as January 20, 2015 at 13:15:00
- TimeZone: Time zone in which date/times encoded in raw audio filenames are reported (e.g, GMT).
- StartDate: Reference date in MM/DD/YY HH:MM:SS text format giving date/time from which all times will be measured.
- ResampleRate: Specify resample rate if desired (optional; specified in samples per second). Original sample rate is taken from the input audio files. A low-pass anti-alias filter is also used when resampling.
- FileDuration: Duration of a single NetCDF file audio/spectrogram file in the "specaudio" subdirectory (specified in seconds). If original recorder files are longer than this, they will be broken up into smaller NetCDF files. Will not allow small raw files to be compiled into larger NetCDF files.
- Frame: Number of samples over which a single FFT will be calculated.
- Overlap: Fraction of overlap of audio data between each successive FFT.
- Smooth: Set to 1 to use 3x3 smoothing operator on each spectrogram; otherwise set to zero.
- CallLibraryFile: Input NetCDF file containing narrowband call library.
- CallLibraryFileBB: Input NetCDF file containing broadband call library.
- DetectionFileDuration: Number of days worth of autodetection information to be stored in a single NetCDF file in the "lfdcs" subdirectory.
- Scale: Scale for converting the floating point spectrogram (units of dB) to unsigned short integer (default = 0.003).
- Offset: Offset for converting the floating point spectrogram (units of dB) to unsigned short integer (default = -100.0).
- SpectrogramDuration: Duration (in seconds) of spectrogram that is saved in memory. This should be many seconds greater than the longest anticipated call.
- PitchTrackingWindow: Duration (in seconds) of "window" over which pitch tracking is conducted. This should be many seconds greater than the longest anticipated call. Typically just a few seconds shorter than SpectrogramDuration.
- NoiseReductionWindow: Time scale (in seconds) over which exponentially weighted running mean is calculated to reduce tonal noise in each FFT frequency band (T in section IIB of Baumgartner and Mussoline 2011; note ε = 1 - exp(ln(0.02)Δt/T) in LFDCS - value 0.15 changed to 0.02 from equation 5 in Baumgartner and Mussoline 2011).
- AvgFFTLowThreshold: Minimum value (in dB) of the average FFT relative to background that can be included in the exponentially-weighted running means. This parameter is included to keep unusually quiet periods out of the running mean used for spectrogram equalization (e.g., during DMON hydrophone shut-off).
- AvgFFTHighThreshold: Maximum value (in dB) of the average FFT relative to background that can be included in the exponentially-weighted running means. This parameter is included to keep unusually loud periods out of the running mean used for spectrogram equalization.
- AvgFFTDurationLimit: If the running mean is not updated for a period of time specified with this parameter (in seconds), the running mean is forced to reset.
- BBP_InThreshold: Minimum level (in dB) of the average FFT to indicate the start of a persistent broadband sound. This parameter defines how loud the average FFT must be to consider it potentially the start of a persistent broadband sound.
- BBP_InDuration: Minimum duration (in seconds) of a loud broadband sound (i.e., average FFT > BBP_InThreshold) before considering it a persistent broadband sound.
- BBP_OutThreshold: Maximum level (in dB) of the average FFT to indicate the end of a persistent broadband sound. This parameter defines how quiet the average FFT must be to consider it potentially the end of a persistent broadband sound.
- BBP_OutDuration: Minimum duration (in seconds) of quiet period after a persistent broad sound (i.e., average FFT < BBP_OutThreshold) to consider a persistent broadband sound is over.
- BBP_MaxDuration: Maximum duration (in seconds) of a persistent broadband sound. After this duration, the running mean is forced to reset and the persistent sound is considered part of the background.
- BB_DetectionThreshold: Minimum amplitude (in dB) of an element in the spectrogram to trigger broadband sound processing (αbb in section IIC of Baumgartner and Mussoline 2011).
- BB_MinSegmentSpan: Minimum span (in Hz) of over-threshold elements in a single FFT to be considered a segment of a broadband sound (φbbseg in section IIC of Baumgartner and Mussoline 2011).
- BB_MinTotalSpan: Minimum total span (in Hz) of all segments combined in a single FFT to consider the FFT potentially "inside" a broadband sound (φΣbbseg in section IIC of Baumgartner and Mussoline 2011).
- BB_MinBroadbandDuration: Minimum duration (in seconds) of sound to be considered a broadband sound (τbb in section IIC of Baumgartner and Mussoline 2011).
- DetectionThreshold: Minimum amplitude (in dB) of an element in the spectrogram to trigger pitch tracking (αpt in section IID of Baumgartner and Mussoline 2011; default = 10.0).
- CostGradientThreshold: Minimum gradient (in dB) of cost function over three spectrogram time steps to end pitch tracking (γ in section IID of Baumgartner and Mussoline 2011; default = 15.0).
- DistanceWeighting: Penalty (in dB) in cost function applied for a frequency "jump" of 1 octave over one spectrogram time step (ω in section IID of Baumgartner and Mussoline 2011; default = 20.0).
- MinCallDuration: Minimum duration (in seconds) a pitch-tracked sound can last to be considered a legitimate call.
- MinAvgAmplitude: Minimum average amplitude (in dB) a sound can have to be considered a legitimate call.
- BlankingTime: Time before and after a time step in the pitch track to be blanked or set to zero (in seconds).
- BlankingFreq: Frequency band (in Hz) above and below a time step in the pitch track to be blanked or set to zero.
Viewing automated detections
Instructions
- 1. Launch IDL in the "lfdcs/process" directory
- 2. IDL> browse_autodetections, lfdcs_index_file
- lfdcs_index_file refers to the index file found in the "lfdcs" subdirectory in the output directory (e.g., /Volumes/ExternalHD/BeringSea/lfdcs/lfdcs_file_index.nc). As a shortcut, you may also just provide the lfdcs subdirectory (e.g., /Volumes/ExternalHD/BeringSea/lfdcs) or the output directory (e.g., /Volumes/ExternalHD/BeringSea).
- You may include numerous keyword parameters to specify exactly the kind of calls you want to examine (see keywords below). For example, to look for fin whale 20-Hz calls on or after 12/10/09, you might use the following keyword parameters: start='12/10/09 00:00:00', min_freq=15, max_freq=25, min_duration=0.25, max_duration=1.25.
- If you would like to manually classify autodetections, set the "classify" keyword (e.g., /classify), and specify which species and call types you intend to classify using the "manual_species" and "manual_call_type" keywords (e.g., manual_species=[1, 2, 3], manual_call_type=[99, 99, 99]). This will provide a list of species on the right side of the display that an analyst can use to manually identify which species produced the call. This is used to evaluate the performance of the LFDCS or to manually reduce the false detection rate.
Keyword parameters
- start - date/time to start browsing autodetections in MM/DD/YY HH:MM:SS format (e.g., start='01/20/15 19:30:00').
- min_amplitude - view all autodetections greater than or equal to a specified minimum amplitude (in dB above background) (e.g., min_amplitude=12).
- max_amplitude - view all autodetections less than or equal to a specified maximum amplitude (in dB above background) (e.g., max_amplitude=20).
- min_mdist - view all autodetections greater than or equal to a specified minimum Mahalanobis distance (e.g., min_mdist=1.0).
- max_mdist - view all autodetections less than or equal to a specified maximum Mahalanobis distance (e.g., max_mdist=3.0).
- min_freq - view all autodetections greater than or equal to a specified minimum frequency (in Hz) (e.g., min_freq=200).
- max_freq - view all autodetections less than or equal to a specified maximum frequency (in Hz) (e.g., max_freq=800).
- min_duration - view all autodetections greater than or equal to a specified minimum duration (in seconds) (e.g., min_duration=1.0).
- max_duration - view all autodetections less than or equal to a specified maximum duration (in seconds) (e.g., max_duration=4.0).
- call_family - view all autodetections in a call family (1: broadband, 2: narrowband) (e.g, call_family=1).
- call_type - view all autodetections of a particular call type (e.g, call_type=[1, 2, 3]).
- classify - set to enable manual classification of each autodetection (e.g., /classify).
- manual_species - specify species codes for manual classification of each autodetection (e.g., manual_species=[1, 2, 5, 10]).
- manual_call_type - specify species-specific call type codes for manual classification of each autodetection (e.g., manual_call_type=[1, 2, 5, 10]). If no call type is needed (you are only identifying species or correct/incorrect), you can omit this keyword parameter.
Manual species codes:
| Species
|
Species Code
|
Call type
|
Call type Code
|
| Unknown
|
0
|
|
-32767
|
| Blue whale
|
1
|
|
-32767
|
| Fin whale
|
2
|
|
-32767
|
| Fin whale
|
2
|
20-Hz pulse
|
1
|
| Sei whale
|
3
|
|
-32767
|
| Brydes whale
|
4
|
|
-32767
|
| Minke whale
|
5
|
|
-32767
|
| Gray whale
|
6
|
|
-32767
|
| NA right whale
|
7
|
|
-32767
|
| NA right whale
|
7
|
up call
|
1
|
| NA right whale
|
7
|
moan
|
2
|
| NA right whale
|
7
|
gunshot
|
3
|
| NP right whale
|
8
|
|
-32767
|
| Southern right whale
|
9
|
|
-32767
|
| Humpback whale
|
10
|
|
-32767
|
| Bowhead whale
|
11
|
|
-32767
|
| Beluga whale
|
12
|
|
-32767
|
| Killer whale
|
13
|
|
-32767
|
| Walrus
|
50
|
|
-32767
|
| Bearded seal
|
51
|
|
-32767
|
| Air gun
|
97
|
|
-32767
|
| Unknown type B
|
98
|
|
-32767
|
| Unknown type A
|
99
|
|
-32767
|
| Correct
|
9999
|
|
-32767
|
| Incorrect
|
-9999
|
|
-32767
|
| Unclassified
|
-32767
|
|
-32767
|
Exporting automated detections
Instructions
- 1. Launch IDL in the "lfdcs/process" directory
- 2. IDL> export_autodetections, lfdcs_index_file, call_type, outfile
- lfdcs_index_file refers to the index file found in the "lfdcs" subdirectory in the output directory (e.g., /Volumes/ExternalHD/BeringSea/lfdcs/lfdcs_file_index.nc). As a shortcut, you may also just provide the lfdcs subdirectory (e.g., /Volumes/ExternalHD/BeringSea/lfdcs) or the output directory (e.g., /Volumes/ExternalHD/BeringSea).
- call_type indicates call types from the call library that you want to export (e.g., call_type = [1, 2, 3]).
- outfile indicates the name of the comma-delimited ASCII file into which automated detections will be exported.
- You may include several keyword parameters to specify exactly the kind of calls you want to export (see keywords below).
Keyword parameters
- sdate - date/time to start exporting autodetections in MM/DD/YY HH:MM:SS format (e.g., sdate='01/20/15 19:30:00').
- edate - date/time to end exporting autodetections in MM/DD/YY HH:MM:SS format (e.g., edate='01/20/15 23:30:00').
- max_mdist - export all autodetections less than or equal to a specified maximum Mahalanobis distance (e.g., max_mdist=3.0).
- broadband - export only broadband autodetections (call family = 1) (e.g., /broadband).
- narrowband - export only narrowband autodetections (call family = 2) (e.g., /broadband). This is the default behavior.
- manual - for all automated detections that are exported, also export associated manual classification information as well (e.g., /manual).
- textdate - export date/time in text format with fractional seconds (e.g., /textdate).
Building a call library
Instructions
- 1. If a call library does not exist, create the call library
- a. Make a new directory in lfdcs/call_library called clXX_YYYY where XX is either "nb" for a narrowband call library or "bb" for a broadband call library", and YYYY is a short designation for your library (e.g., the directory clnb_gom would be created for a narrowband library of calls specific to the Gulf of Maine).
- b. Launch IDL in the "lfdcs/call_library" directory.
- c. IDL> create_call_library
- d. Follow the prompts of this program to create and annotate your new call library.
- e. The usual naming convention for the call library is "call_library_XXXX.nc" where XXXX is some short designation for this particular library. However, you may use any naming convention you wish. Note that the call library actually consists of 4 NetCDF files: call_library_XXXX.nc, call_library_XXXX_audio.nc (where audio clips of all exemplar calls are stored), call_library_XXXX_exemplar.nc (where information about each exemplar is stored), and call_library_XXXX_track.nc (where pitch tracks are stored for narrowband libraries; this file is empty for broadband libraries).
- 2. Find exemplar calls to add to the call library by using the program "find_exemplars"
- a. Launch IDL in "lfdcs/call_library"
- b. IDL> find_exemplars, lfdcs_index_file, call_library_file
- lfdcs_index_file refers to the index file found in the "lfdcs" subdirectory in the output directory (e.g., /Volumes/ExternalHD/BeringSea/lfdcs/lfdcs_file_index.nc). As a shortcut, you may also just provide the lfdcs subdirectory (e.g., /Volumes/ExternalHD/BeringSea/lfdcs) or the output directory (e.g., /Volumes/ExternalHD/BeringSea).
- call_library_file refers to your call library (e.g., clnb_gom/call_library.nc).
- You may include numerous keyword parameters to specify exactly the kind of calls you want to examine. These include the following: start, call_family, call_type, min_amplitude, min_mdist, max_mdist, min_freq, max_freq, min_duration, max_duration (e.g., to look for fin whale 20-Hz calls on or after 12/10/09, you might use the following keyword parameters: start='12/10/09 00:00:00', min_freq=15, max_freq=25, min_duration=0.25, max_duration=1.25).
- If the number of call types in the call library is large, you will not be able to fit enough call type buttons on the right side of the display. To control the call type buttons, use the call_type_buttons keyword parameter (e.g., to only display call types 1, 2, and 10, use the following keyword parameter: call_type_buttons=[1, 2, 10])
- 3. Manage the call library with the program "manage_call_library"
- a. Launch IDL in "lfdcs/call_library"
- b. IDL> manage_call_library, call_library_file
- call_library_file refers to your call library (e.g., clnb_gom/call_library.nc).
- The program will prompt you to select a call type in the call library, and then you will be able to manage exemplars within that call type, including play, view, and delete exemplars, move exemplars to different call types, and add/delete call types.
Reclassifying autodetections
Instructions
- 1. Launch IDL in "lfdcs/process"
- 2. IDL> reclassify_autodetections, lfdcs_index_file, call_library_file
- lfdcs_index_file refers to the index file found in the "lfdcs" subdirectory in the output directory (e.g., /Volumes/ExternalHD/BeringSea/lfdcs/lfdcs_file_index.nc).
- call_library_file refers to your call library (e.g., clnb_gom/call_library.nc). You can specify a narrow- or broadband call library. For a broadband call library, only autodetections in call family 1 (broadband calls) will be classified, and for a narrowband call library, only autodetections in call family 2 (narrowband calls) will be classified.
Evaluating your call library
Several programs have been developed to evaluate a call library. Quadratic discriminant function analysis relies on the assumption that the distribution of the 7 attributes for a particular call type are multivariate normal (or nearly so). Visualizing data from tens to hundreds of exemplars in 7 dimensions is impossible, so we have to use a few different tools to help us get a handle on these data. It is also important to ensure that call types do not overlap in multivariate space too much, as the discriminant function analysis will confuse such overlapping call types. When these overlapping call types are produced by different species, the chance of misclassifying species increases.
Checking actual vs. expected Mahalanobis distance
Samples drawn from a multivariate normal population have a known distribution of univariate Mahalanobis distances (the "distance" from the sample to the mean vector that accounts for the "shape" of the multivariate normal distribution as described by the variance-covariance matrix). The square of the Mahalanobis distance should have a chi-squared distribution with p degrees of freedom where p is the number of attributes in the call library (p = 7 for us). If the distribution of Mahalanobis distances for a call type does not conform to what we expect (the chi-squared distribution), then it is likely that the underlying distribution of attributes for the call type in question is not multivariate normal. When a call type is not multivariate normal, the discriminate function analysis may not always classify calls as expected (since we're violating one of the underlying assumptions of discriminant function analysis). To check the Mahalanobis distribution of each call type in a call library, do the following:
- Launch IDL in the "lfdcs/call_library" directory
- IDL> plot_mdist_distribution, call_library
- call_library is the name of the call library you want to check (e.g., clnb_gom/call_library.nc)
- use the call_type keyword to look at a subset of call types
- use the ps keyword to output the results to a Postscript file
Each plot shows the distribution of Mahalanobis distances for a call type (cumulative probability distribution on left, probability distribution function on right) compared to the ideal distribution for a multivariate normal distribution (in red):
Example plot_mdist_distribution output:

Viewing multivariate distributions with scatterplots
To assess overlap in multivariate distributions, a simple set of scatterplots showing each call type's attributes plotted against one another can be used. Separation between call types in one or more of these plots suggests that the call types can be discriminated. To produce these scatterplots, do the following:
- Launch IDL in the "lfdcs/call_library" directory
- IDL> compare_call_types_scatter, call_library
- call_library is the name of the call library you want to check (e.g., clnb_gom/call_library.nc)
- use the call_type keyword to look at a subset of call types
- use the ps keyword to output the results to a Postscript file
Example compare_call_types_scatter output:

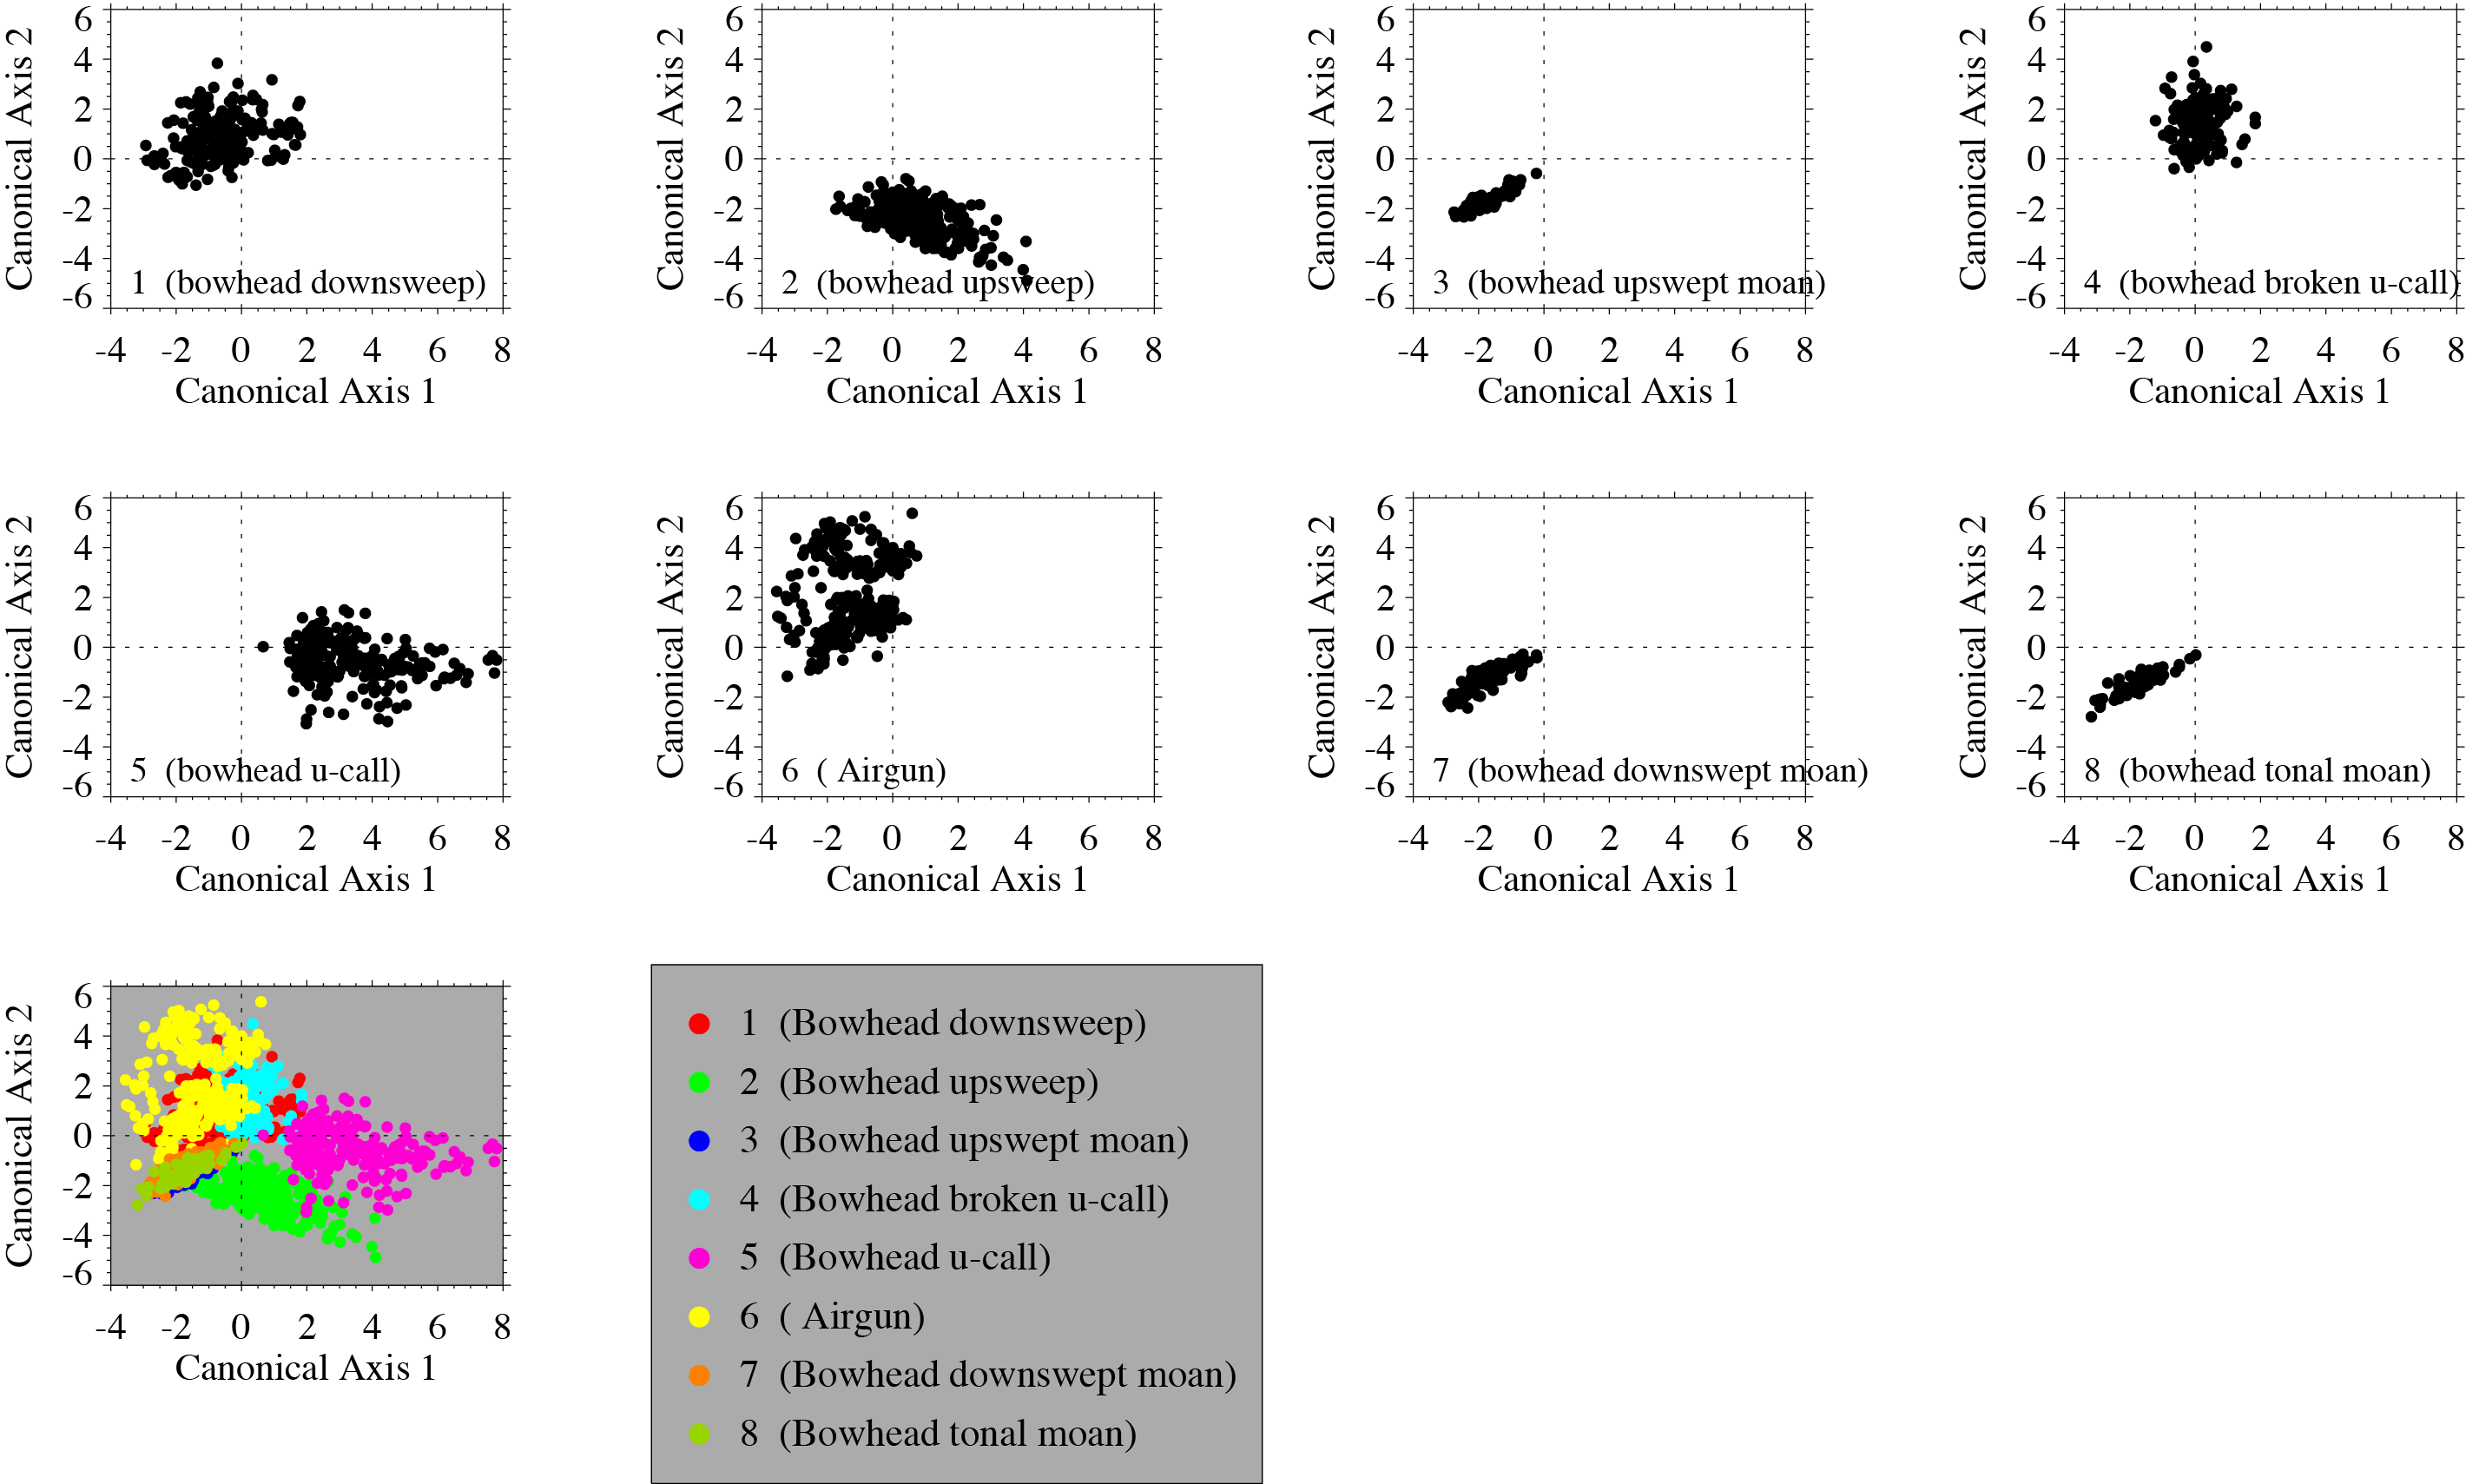
Viewing multivariate distributions with canonical discriminate function analysis
To assess overlap in multivariate distributions, canonical discriminant function analysis (CDFA) can be used to reduce the 7 attribute dimensions down to 2 so that the distributions can be directly visualized using scatterplots. CDFA seeks to find linear combinations of the 7 variables that best discriminates between the call types. By plotting the first two linear combinations (canonical variables), we hope to visualize which call types are well separated and which overlap. It is important to recognize that the CDFA plots are a "representation" of the 7-dimensional distribution of the attributes for each call type; they are not the actual multivariate distributions. Caution is warranted when interpreting these plots, but they can give helpful clues about which call types may interfere with one another. To generate the CDFA plots, do the following:
- Launch IDL in the "lfdcs/call_library" directory
- IDL> compare_call_types_canonical, call_library
- call_library is the name of the call library you want to check (e.g., clnb_gom/call_library.nc)
- use the call_type keyword to look at a subset of call types
- use the ps keyword to output the results to a Postscript file
Example compare_call_types_canonical output:
Frequently asked questions
Coming soon...
Installation
Install each of the software packages below to run the desktop LFDCS.
Install XCode (optional)
Note: you only need to install XCode if you will be creating the NetCDF distribution or compiling the LFDCS DLM code. The vast majority of users will not need to do this.
- Launch the App Store application on the Mac
- Search for XCode.
- Install
- Launch XCode, open Preferences, select the Downloads tab, install the Command Line Tools, and exit. This will make programs like "gcc" and "make" available in the Terminal window.
Install TextMate (optional - TextMate is a good text editor, but you can use any one you like)
- Open http://www.macromates.com in web browser (e.g., Safari, Firefox)
- Choose "Download"
- Open TextMate*.tbz file in browser's downloads folder
- Move TextMate application to Applications folder
Install IDL (required)
- Install IDL following installation instructions from Exelis
- Copy the "idl_startup" file from the distribution to your home directory (e.g., /Users/Mark)
- If you are running IDL from a terminal window, use the "tcsh" shell (open up Terminal Preferences and make sure the shell opens with /bin/tcsh). Add the following lines to the file .cshrc in your home directory (e.g., /Users/Mark/.cshrc):
- setenv PATH $PATH":/usr/X11R6/bin:/Applications/itt/idl/bin"
- source /Applications/itt/idl/bin/idl_setup
- setenv IDL_STARTUP $HOME/idl_startup
- setenv IDL_DLM_PATH "/Applications/itt/idl/bin/bin.darwin.x86_64:$HOME/idl_dlm"
Install NetCDF software (optional)
- 1. Download and install zlib
- a. Obtain the source code from http://www.zlib.net
- b. In the directory where you unzipped the zlib source code, type in the following UNIX commands
- ./configure --prefix=/usr/local
- make
- make check
- sudo make install
- c. Note: the "sudo" command will require you to enter your password.
- 2. Download and install HDF5
- a. Obtain the source code from http://www.hdfgroup.org/HDF5/
- b. In the directory where you unzipped the HDF5 source code, type in the following UNIX commands
- ./configure --disable-production --prefix=/usr/local/hdf5 --with-zlib=/usr/local
- make
- make check
- sudo make install
- c. Note that the "--disable production" option is required to avoid an error (it turns off optimization).
- d. Note: the "sudo" command will require you to enter your password.
- 3. Download and install NetCDF
- a. Obtain the source code from http://www.unidata.ucar.edu/downloads/netcdf
- b. In the directory where you unzipped the NetCDF source code, type in the following UNIX commands
- setenv CPPFLAGS '-I/usr/local/hdf5/include'
- setenv LDFLAGS '-L/usr/local/hdf5/lib'
- ./configure --prefix=/usr/local --disable-dap
- make check
- sudo make install
- c. Note: the "--disable_dap" option is required to turn off Remote Data Client (not needed).
- d. Note: the "sudo" command will require you to enter your password.
- Note for installing NetCDF 4.3.0
- Building the netCDF C library with the clang C compiler, the default /usr/bin/cc on OSX 10.9 Mavericks, detects an error in compiling ncgen3/load.c. A fix is to insert the line
- #include <config.h>
- above the "#include <stdlib.h>" statement near the beginning of ncgen3/genlib.h.
- This fix will be in the next release.
Install LFDCS for the first time
- 1. Set up Terminal environment
- a. In your home directory (e.g., /Users/Mark), create a file called .cshrc (note the period in front of "cshrc"), and copy/paste the following into that file:
- set prompt="!"%" "
- setenv PATH $PATH":/Applications/exelis/idl/bin:/usr/local/bin:$HOME/bin"
- # For IDL
- source /Applications/exelis/idl/bin/idl_setup
- setenv IDL_STARTUP $HOME/idl_startup
- setenv IDL_DLM_PATH "/Applications/exelis/idl/bin/bin.darwin.x86_64:$HOME/idl_dlm"
- b. In your home directory (e.g., /Users/Mark), create a file called idl_startup, and copy/paste the following into that file:
- !path =!path + ':' + file_search('$HOME') + '/idl_src'
- !path =!path + ':' + file_search('$HOME') + '/idl_src/right'
- device, decomposed=0
- device, retain=2
- c. Launch Terminal (you can find this in Utilities folder in Applications)
- i. Open Preferences (in menu under "Terminal")
- ii. In Startup, set "Shells open with:" to "Command" and write /bin/tcsh in the dialog box
- iii. In Settings, select the "Shell" tab, and set "When the shell exits" to "Close if shell exited cleanly"
- d. Launch XQuartz (you can find this in Utilities folder in Applications)
- i. Open Preferences (in menu under "X11")
- ii. In the Input tab, select "Emulate three button mouse", "Follow system keyboard layout", and "Enable key equivalents under X11"
- iii. In the Windows tab, select "Click-through Inactive Windows"
- 2. Install LFDCS code
- a. From your home directory (e.g., /Users/Mark), create the following directories: Projects, Projects/Detectors, Projects/Detectors/lfdcs, and Projects/Detectors/lfdcs/distribution
- b. Copy the unpack_distribution.pro and lfdcs_v1_1.tar.gz files into ~/Projects/Detectors/lfdcs/distribution directory
- c. Launch IDL
- e. IDL> unpack_distribution, 'lfdcs_v1_1.tar.gz'
- 3. Set up IDL dynamically loadable module (DLM) directory
- a. From your home directory (e.g., /Users/Mark), create the following directory: idl_dlm
- b. Launch Terminal and type in the following commands
- cd ~/idl_dlm
- ln -s ~/Projects/Detectors/lfdcs/idl_dlm/call_tracking_lfdcs_dlm.dlm ./
- ln -s ~/Projects/Detectors/lfdcs/idl_dlm/call_tracking_lfdcs_dlm.so ./
Install LFDCS version 1.1 over a previous version
- 1. Backup your current LFDCS directory (just in case)
- a. Navigate to ~/Projects/Detectors in Finder
- b. Copy the "lfdcs" directory to ~/Projects/Detectors (i.e., make a copy of "lfdcs" inside the same parent directory)
- c. Rename the copied directory to something like "lfdcs_YYYY_MM_DD" (where YYYY is the year, MM is the month, and DD is the day today)
- 2. Load new version of the LFDCS
- a. Create "lfdcs/distribution" directory if it does not already exist
- b. Copy the file "unpack_distribution.pro" to the distribution directory if it is not already there
- c. Copy lfdcs_v1_1.tar.gz to the distribution directory
- d. Launch IDL
- e. IDL> unpack_distribution, 'lfdcs_v1_1.tar.gz'
- 3. Reformat your call libraries
- a. Launch IDL in the "lfdcs/call_library" directory
- b. IDL> reformat_library_one_shot
- this may take a few minutes
Home